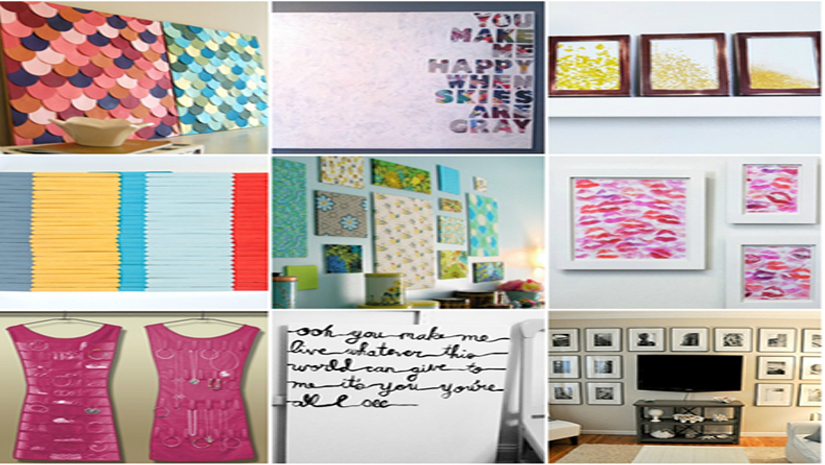
Want to bring your blank, boring walls to life? Try out these simple 9 DIY (do it yourself) mini-projects and adorn your blank walls with these art-pieces that reflect you and your style. You can choose from the peppy to classic to monochromes as per your style and most importantly the theme of your room and the room you are trying to re-decorate.
1. Scallop Wall Art: This is an interesting and a classy DIY that would result in such a simply yet breath-taking art that one would not be able to take his/her eyes away from this. You can either try this in monochromes or can use colored papers/cards if you want some vibrancy on your shelf or walls.
You will need:
a. A Thermocol Sheet/A thin cardboard or a thin wooden board as the base
b. A stack of various colored cards or color-papers
c. A circle puncher
d. Glue
Procedure:
– Punch numerous circles from the colored stack of cards/papers and lay them aside
-Then mark your base in rows that are half the size in diameter of your punched circles.
-Now, apply the glue onto the markings of the base
– Take the punched circles and start gluing them onto the glued line one after the other.
-Let the top row of circles hang on to the rows of circles below.
Tadaaa . . . There you go you now have our own scalloping wall art. Try them in complimentary colors or use metallic colors or monochromes – its upto you. Get that creative bone thinking and savor the results.

2. Fabric Panels:

This is the one of the easiest and less time-taking DIY to adorn your blank walls. They add a touch of elegance and color to that boring and blank wall.
We all have those fabrics that we cannot either throw or put them to any use, so why not put it as a wall art?
You will need:
a. Fabrics
b. Thermocol sheet or a canvas
c. Double side tape or wall putty
d. Stapler or pins/glue
Procedure:
– Cut the Thermocol sheet in the required size (if using one)
– Now wrap the fabric around the base. Make sure you have about 1″ to 1.5″ of fabric to fold over to the backside.
– either glue the fabric or staple /pin it to the base
-Use a wall-putty to put up the Thermocol on the walls. If you have used canvas, then you will have to hang it on the nails.
There You go. You have a personalized wall art in less than 10 minutes. Isn’t it easy and adorable? It also adds the elegant touch that you have craving.

3. Framed Glitter:

Want to bring in some glittery shine in your room? Then this DIY is what you need. It’s super-easy (also super-messy to clean up) and a total FUN! But, it’s not that fun to clean up! This DIY can bring in chic, metallic and fun touch to your walls.
You will need:
a. Picture frames
b. Glitter
c. Spray adhesive or normal one – You will need to spread it randomly
d. Paper and scissors
Procedure:
-Cut the papers an inch shorter than the size of the frame.
-Now spread some newspapers to minimize the mess
-Spray or spread the glue in whatever random shape you like
-Within 15 seconds start sprinkling the glitter onto the paper
– Once dry, or after about 5-7 minutes dust off the extra glue from the paper
-Carefully, put your glittery art in the frame and show-off your metallic and chic artistic side to everyone. *Winks*

4.Gallery Walls

This is an amazing DIY to adorn those blank walls either in your study or in the seating area. They bring out the elegance and also refresh your memories take you down the memory lane. You can also use few of the oldest photographs from the store room that belonged to your grandparents and make a family photo wall which has photos from all the generations and arrange it tactically.
There you go- this FIY gives a new and artistic meaning to old is gold.
5.Wall-Hanging your jewelery.

Bored of blank walls? No artistic or creative bone or a bit too lazy? Then buy this wall hanging jewelery organizer. You can arrange all your jewelries in a more systematic and ordered way and you have an added bonus- All your jewelery will be safe. You won’t miss any of them in those piles and piles of jewelery that you have in your closet and you will save about 5 minutes of your precious time as you wouldn’t have to search for that one earring that went missing in the pile *winks*
6. Lyrics Painting: This is one of our favorite picks. On a white or any pastel colored plain fabric, write a part of the lyrics that you are most fond of, in an artistic way with a pencil. Now, with a fabric paint, trace the lyrics and let it dry. Wrap it over a thermocol sheet or a canvas and tadaa. . You have your personalized wall-art. This wasn’t that tough- was it?
7. Quotes on Canvas:

It is one of those super-cute and classy with a touch of vibrancy to it. Its time-taking, no doubt, but you will be left speechless when you see the end result. It’s a must try for people who love DIY and want to try something interesting.
You will need:
a. An old painting or a wall canvas or Thermocol if you are on a low budget.
b. Paint – of your choice (preferably white or yellowish-white)
c. Adhesive
d. Magazines or Newspapers
e. Painter’s tape
f. Sponge brush
g. Vinyl letters
Procedure:
– Tear out pieces of Newspapers and Magazines and glue it onto the base. Make sure you glue the vibrant and good/multicolored pieces in the place where you want your quotes to be, as you will paint over other places.
-When whole of your base is completely covered in these papers, carefully align the last letters of your quote first at the edges and then keep on aligning others letters so you would be sure of the spacing- Buy dull adhesive letters else it gets bit trickier to paint.
-Now carefully paint all over the base with a sponge brush with the paint of your choice.
– Let it dry completely.
– After the whole base is completely dry, remove the letters carefully.
Tadaaa . . There it is- your marvelous piece of art-work. We bet you will be amazed at your artistic bone *winks*

8. Color Block Canvas:

Who said popsicle sticks (ice-cream sticks) are only for kids. There are many DIY for these sticks, but let’s add some color and vibrancy to these sticks and make it into a wall-art. This DIY brings life and vibrancy to the blank walls and also to the room.
You will need:
blank canvas or a thin cardboard sheet
five colors of paint,
popsicle sticks (about 150)
Procedure:
a. Paint popsicle sticks by segregating them in 5 piles of 30. Paint each pile of 30 sticks in a particular color.
b. Layout the design after the sticks dries onto the canvas.
c. Overlap the sticks, go ahead and layout the top layer of sticks
d. Secure the design after you have settled on a layout you’re happy with, go ahead and glue each stick.
e. Let it dry and there you have it- Your latest wall art

9. Framed Kiss:

This DIY is quite easy and can be super-super fun. All You need is a piece of paper and all the lipsticks that you have. No… No…We are NOT asking you to draw with your lipsticks *Horror* All you have to do is kiss the piece of the paper until the color fades and then either re-apply or use a different color and repeat the process. FUN isn’t?
Now, you can either gift this to your boyfriend or frame it in your wall- You have a myriad of fun colored kaleidoscopic smooches adoring the frame on your wall.
There you go guys- These are our top 9 favorites in DIY to adorn your walls and make it your personal space with your personal touch.
By: Archa Dave


